
Introduction
As winter makes its graceful exit, spring bursts onto the scene, bringing with it a fresh palette of colors and a sense of renewal that influences everything from fashion to beauty. This season is not just about blooming flowers and warmer weather; it’s also a wonderful opportunity for you to express your creativity through nail art. There’s something undeniably joyful about using your nails as a canvas, allowing you to showcase your personality and style. In this article, we’ll explore charming spring nail art ideas that you can easily create at home, perfect for welcoming the vibrant spirit of spring. Whether you’re a beginner or an experienced nail artist, you’ll find inspiration to help you celebrate the season in style.
“Creating a cozy reading nook is all about maximizing comfort in a small space. It’s about intentional design that serves both function and feeling.”
– Interior Design Magazine
Pastel Palette Perfection
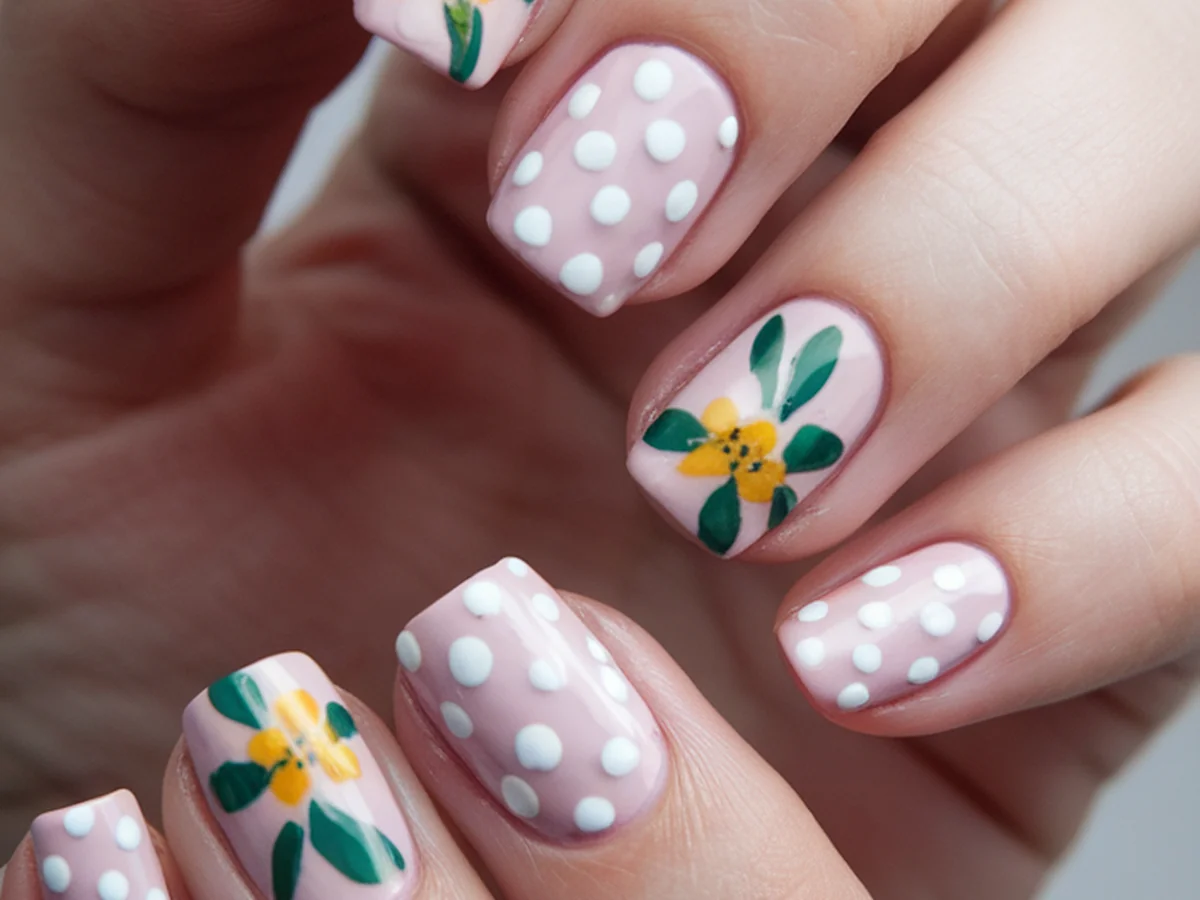
Spring is synonymous with soft, delicate hues that evoke a sense of tranquility and softness. Pastel colors are a staple for this time of year, making them an ideal choice for your nail art. Think gentle pinks, mint greens, baby blues, and buttery yellows. When choosing your pastel shades, consider your skin tone: warmer tones, like peachy pinks and soft yellows, complement warm skin tones, while cooler tones, such as lavender and mint, can enhance cooler complexions.
To achieve a smooth pastel finish, make sure to start with a clean nail surface. A base coat not only protects your nails but also helps the polish adhere better. Apply two thin layers of your chosen pastel color, allowing each coat to dry completely before applying the next. For a lovely ombre effect, you can blend two pastel shades together using a makeup sponge. Simply dab the sponge onto the nail, alternating between colors, for a seamless transition.
Some classic pastel nail art designs you might enjoy include:
– Ombre: A gradient effect that blends two or more colors together seamlessly.
– Polka Dots: Use a dotting tool or a toothpick to create fun polka dots in contrasting pastel shades.
– Stripes: Use striping tape to create clean, crisp lines in alternating colors.
With these techniques, you can create a pastel paradise right at your fingertips.
Floral Fantasy
Floral designs are an eternal favorite for spring nail art, capturing the essence of blooming flowers and nature’s beauty. The charm of flower patterns lies in their versatility and the joy they bring. Creating simple flower designs can be done with just a few tools and some practice.
To start, gather your materials: a base coat, your chosen nail polish colors, a dotting tool or a fine brush, and a top coat. Here’s a quick step-by-step guide to creating a simple flower design:
1. Base Coat: Apply a base coat to protect your nails and allow your nail polish to adhere better.
2. Petals: Using a dotting tool or a fine brush, dab small dots in a circular pattern to form petals. You can use one color or multiple colors for a more vibrant look.
3. Center: Add a contrasting dot in the center of the petals to complete the flower.
4. Top Coat: Finish with a top coat to seal your design and add shine.
For easy floral nail art, consider using tools like nail brushes or even a toothpick for more intricate designs. If you want to take it a step further, explore variations like 3D flowers using nail art acrylics or create abstract floral patterns that capture the essence of spring without being too literal.
Geometric Patterns
Geometric patterns have become increasingly popular in nail art, adding a modern twist to your spring manicure. These designs allow for creativity and precision, making them perfect for those who enjoy structured art. The clean lines and shapes of geometric patterns can be easily achieved with some basic techniques.
To create geometric nail art, consider using tape or stencils to form clean lines and shapes. Start by painting your nails with a base color and allowing it to dry completely. Then, you can apply tape in the desired geometric pattern, leaving sections exposed for a contrasting color. Once you’ve laid down the tape, paint over the entire nail and carefully remove the tape before the polish dries to reveal perfect lines.
Color combinations play a crucial role in geometric designs. Here are a few suggestions that work beautifully together:
– Pastel Pairings: Soft pinks with mint greens or lavender with pale yellow.
– Monochrome: Various shades of the same color for a chic look.
– Bold Contrasts: Black and white with a pop of a bright color, like neon pink or electric blue.
Examples of fun geometric nail art looks include chevrons, triangles, and overlapping shapes. With geometric nail art, you can create stunning designs that are both eye-catching and sophisticated.
Minimalist Designs
If you appreciate the elegance of simplicity, minimalist nail art is the perfect choice for spring. This style emphasizes clean lines and subtle accents, making it a chic option for any occasion. The beauty of minimalist designs lies in their ability to convey sophistication with minimal effort.
One of the key elements of minimalist nail art is the use of negative space, which allows your natural nail to shine through. You can achieve this by painting only part of your nail or using clear polish as a base for accent designs. Simple designs like dots, lines, or half-moons can make a significant impact without overwhelming your look.
Here are some ideas for minimalist nail art designs:
– Negative Space Lines: Paint a horizontal or vertical line across your nail, leaving one side bare.
– Dotted Accents: Add a single dot or a series of dots near the cuticle for a subtle yet stylish touch.
– Half-Moon: Paint the base of your nail a different color than the rest for a chic half-moon effect.
When choosing colors for minimalist designs, opt for soft pastels or neutral shades that enhance the overall aesthetic. A well-placed accent color can also elevate your minimalist look without overpowering it.
Nature-Inspired Themes
Spring is a celebration of nature, and what better way to reflect that than through nature-inspired nail art? From delicate leaves to vibrant butterflies and warm sunshine, there are countless ways to incorporate the beauty of the outdoors into your manicure.
You can create nature-themed designs using traditional painting techniques or nail stamping kits. If you choose to paint, start with a base coat, then use a fine brush to create your desired motifs. If you prefer stamping, simply choose your favorite design from a stamping plate, apply polish to the plate, and transfer the design onto your nail.
Consider using natural elements like dried flowers or leaf imprints for added texture and uniqueness. Here’s how to get started:
1. Dried Flowers: Press small dried flowers into wet nail polish and seal with a top coat for a beautiful, organic look.
2. Leaf Stencils: Use stencils to create leaf patterns; this can be especially effective with green shades and gold accents.
3. Butterfly Motifs: Create small butterflies on your nails using a combination of colors to mimic their wings.
When selecting colors for nature-themed nail art, think about earthy tones like greens, browns, and soft pastels that reflect the season. This will help you create a harmonious look that captures the essence of spring.
Springtime Glitter and Shine
Nothing says celebration quite like a little sparkle! Incorporating glitter into your spring nail art can add a playful touch and elevate your overall look. Whether you prefer a subtle shimmer or a bold glitter statement, there are endless ways to make your nails shine.
One of the easiest ways to incorporate glitter is by creating accent nails. Choose one or two nails on each hand to adorn with a glitter polish while keeping the others in a complementary color. This not only adds interest but also keeps your look balanced.
When applying glitter, here are some tips to avoid bulk:
– Layering: Instead of applying one thick coat, build up the glitter with multiple thin layers. This will help create a smoother finish.
– Glitter Placement: Use a small brush to precisely place glitter where you want it, such as at the tips of your nails or along the cuticle line.
Balance your glitter with softer spring colors to create a harmonious look. For example, pair a pastel base with silver or gold glitter tips. This way, the sparkle enhances the spring vibe without overpowering it.
Seasonal Nail Decals and Stickers
For those who might feel intimidated by freehand nail art, seasonal nail decals and stickers offer an easy and fun alternative. These pre-made designs allow you to achieve elaborate looks in just a few simple steps, making nail art accessible to everyone.
You can find a wide variety of nail decals and stickers online or at local beauty supply stores. Look for spring-themed options featuring bunnies, flowers, eggs, and other seasonal motifs. If you’re feeling creative, you can even make your own decals using printable sticker paper.
To apply nail decals smoothly and ensure they last, follow these steps:
1. Prepare Your Nails: Start with a clean, dry surface and apply a base coat.
2. Placement: Carefully peel the decal from its backing and place it on your nail. You can use tweezers for better precision.
3. Seal It In: Finish with a top coat to protect the decal and give your nails a glossy finish.
Popular spring-themed decals can include colorful florals, cute animals, and seasonal patterns that capture the spirit of the season, allowing you to customize your look effortlessly.
Easy Nail Art Tools for Home Use
Creating beautiful nail art at home doesn’t require a professional setup. With just a few essential tools, you can unleash your creativity and achieve stunning results. Here’s a list of must-have tools for your nail art journey:
| Tool | Purpose | Alternative |
|---|---|---|
| Dotting Tool | Create dots and intricate designs | Toothpick |
| Nail Brush | Paint detailed designs | Old eyeliner brush |
| Striping Tape | Make clean lines and patterns | Masking tape |
| Sponges | Ombre and gradient effects | Makeup sponges |
These tools are not only easy to use but also budget-friendly. If you’re looking for alternatives, consider using common household items like toothpicks, cotton swabs, or even old makeup brushes to achieve various effects.
When shopping for nail art supplies, check out local beauty stores or online retailers for affordable options. There’s a whole world of nail art tools waiting for you to explore!
Conclusion
Spring nail art is a delightful way to embrace the season and showcase your creativity. With the simple ideas and techniques shared in this article, you can transform your nails into a stunning canvas that reflects the beauty and joy of spring. Whether you opt for pastel palettes, floral fantasies, or minimalist designs, the key is to enjoy the process and experiment with different styles. We encourage you to try out these ideas and share your creations with your friends and on social media using our special hashtag #SpringNailArt. Let’s celebrate the arrival of spring together, one fabulous manicure at a time!
Frequently Asked Questions
What are the best colors for spring nail art?
Spring nail art often features pastel colors like soft pinks, blues, greens, and yellows. These colors evoke feelings of freshness and warmth, making them perfect for the season. Additionally, you can incorporate floral colors such as lavender and peach for a more vibrant look.
How can I make my nail art last longer?
To ensure your nail art lasts, start with a good base coat to protect your nails and enhance polish adherence. After applying your design, finish with a quality top coat to seal everything in. Avoid activities that may chip your nails, and consider reapplying top coat every few days.
Are there any tools I can use to create nail art at home?
Yes! Essential tools for home nail art include dotting tools, nail brushes, striping tape, and sponges. If you’re on a budget, you can use household items like toothpicks or old makeup brushes as alternatives to achieve similar effects.
Can I use stickers or decals for nail art?
Absolutely! Nail decals and stickers are a great way to create intricate designs without the need for freehand skills. They come in a variety of themes and can easily be applied by following a few simple steps, making them perfect for anyone looking to enhance their manicure.
How do I remove nail art without damaging my nails?
To remove nail art safely, use an acetone-based nail polish remover. Soak a cotton ball in the remover and press it against your nail, wrapping it in foil for a few minutes. This will help dissolve the polish without damaging your natural nails. Always follow up with a nourishing cuticle oil or hand cream to keep your nails healthy.